
Install TensorFlow(GPU) on WSL2
This article introduces my solutions/methods of installing and using TensorFlow(GPU)(2.6.1), with keras(3.0.5) on WSL2. My specific environment is:
WSL2: 2.0.14.0
WSL2's Linux system: Ubuntu22.04
PowerShell: 7.4.1
Conda: 24.1.2
Cuda: 12.4.0
Cudnn: 8.9.7.29
Python: 3.12.2
TensorFlow: 2.16.1
Keras: 3.0.5
Motivation
It seemed very easy and smooth to install TensorFlow(GPU) on WSL2 in the last few years, when WSL2 started to support CUDA. But recently, the installation and usage may bring some annoyance, such as:
- GPU not detected on WSL2 · Issue #63341 · tensorflow/tensorflow (github.com)
- TF 2.16.1 Fails to work with GPUs · Issue #63362 · tensorflow/tensorflow (github.com)
I guess it maybe because some documentations has not been updated since the TensorFlow experienced large changes in a short term:
- It does not support Windows-GPU since version 2.11.
- It begins to use keras3.x abruptly since version 2.16.1.
I was used to Keras/TensorFlow instead of PyTorchor Jax. Since the version 3.0, Keras begins to support multi-backends:
As a multi-framework API, Keras can be used to develop modular components that are compatible with any framework – JAX, TensorFlow, or PyTorch.
I prefer to use keras(3.x) as its design philosophy coincides with my views on machine learning.
I hold the view that any machine learning algorithm should not be restricted by any platform or framework. A better piece of code should be one that can be easily transferred from one framework to another, as long as the source framework and target framework are both designed well and the code itself is designed well. We should decouple and focus on those elements that are not relevant to a specific framework, which are close to the real machine learning problem instead of being close to programming. Then we can write out the well-designed code that can be easily transferred.
I wish more and more people could use Keras(3.x) as me, making this community bigger and stronger and ultimately benefiting each of us. Therefore, I share my solutions/methods of installing and using TensorFlow(GPU)(2.6.1), with keras(3.0.5) on WSL2, holping this may help those who encountered with installation problems.
Preparation
Maybe different from general tutorials, my solutions do use conda, PowerShell and PowerShell module PSComputerManagementZp(I developed it). But, the eventually results are the same, i.e., installing and using TensorFlow(GPU)(2.6.1), with keras(3.0.5) on WSL2 correctly.
Anyone who is familiar with Linux and bash shell can easily transfer my following procedures to their own production environments. If you are a novice in Linux, you can take all of my following procedures and do not consider too much customization.
Install VS Code and the WSL extension
Omitted.
We can follow the official tutorials here. Any way will be ok, as long as we can start Windows’s VS Code in WSL2’s shell (default is bash) by the following command:
1 |
|
Install PowerShell 7.x on WSL2
Install PowerShell 7.x. Refer to Installing PowerShell on Ubuntu - PowerShell | Microsoft Learn
1
2
3
4
5
6
7
8
9
10
11
12
13
14
15
16
17
18
19
20
21
22
23
24
25
26
27
sudo apt update && sudo apt upgrade
# Install pre-requisite packages.
sudo apt install -y wget apt-transport-https software-properties-common
# Get the version of Ubuntu
source /etc/os-release
# Download the Microsoft repository keys
wget -q https://packages.microsoft.com/config/ubuntu/$VERSION_ID/packages-microsoft-prod.deb
# Register the Microsoft repository keys
sudo dpkg -i packages-microsoft-prod.deb
# Delete the Microsoft repository keys file
rm packages-microsoft-prod.deb
# Update the list of packages after we added packages.microsoft.com
sudo apt update
###################################
# Install PowerShell
sudo apt install -y powershell
# Start PowerShell
pwshMake
pwshstart automatically when WSL2 boot. (It is different from “Makepwshthe default shell of WSL2”.)1
2
3
4
# exit pwsh, still in bash
cd $Home
code ~/.profileThen, append
pwshto the~/.profileas:1
2
3
4
5
6
7
8
# the default umask is set in /etc/profile; for setting the umask
# for ssh logins, install and configure the libpam-umask package.
#umask 022
...
...
...
pwshsave the
~/.profileand exit VS Code.Restart WSL2, then, we will automatically in
pwshwhen login to WSL2.
The following procedures are all in pwsh instead of
bash. So, it is necessary to make pwsh start
automatically when WSL2 boot.
Install PowerShell Module PSComputerManagementZp
The PowerShell Module, PSComputerManagementZp, is developed to make some configuration easier. The following steps take some advantage of this module. The installation refer to here:
1 | #!/bin/pwsh |
Install miniconda
Refer to here:
1 | #!/bin/pwsh |
After installing, initialize miniconda for pwsh:
1 | #!/bin/pwsh |
Restart WSL2, then, we will automatically in pwsh with
conda(base env) as:

Then, we can move to the next steps.
Install TensorFlow(GPU)
In this section, we take the most important procedures of this article.
It should be announced that I use conda to manage an environment, and
I install cuda and cudnn to this environment, instead of using
apt and installing to normal /usr/*
directories as most tutorials do. This is the point of this article and
it influences all the following steps. Of course, it is officially
supported in the documentation of conda-installation.
Create a conda env
We can create a conda environment (my env is named ml)
with Python 3.12:
1 | #!/bin/pwsh |
Install cuda and cudnn
Install cuda by conda with channel
nvidia:1
2
3#!/bin/pwsh
conda activate ml
conda install cuda=12.4 -c nvidiaInstall cudnn manually:
Download cudnn installer (tar) from here:
Make the downloaded file (my file is
cudnn-linux-x86_64-8.9.7.29_cuda12-archive.tar.xz) in a Windows path (my path isC:\Users\user\Downloads\cudnn-linux-x86_64-8.9.7.29_cuda12-archive.tar.xz)Then, we can copy the cudnn installer from Windows to WSL2:
1
2#!/bin/pwsh
cp /mnt/c/Users/user/Downloads/cudnn-linux-x86_64-8.9.7.29_cuda12-archive.tar.xz $Home/Here you should take your path and modify the above commands.
Decompress the cudnn installer and copy its items to our
mlenv:1
2
3
4
5
6
7#!/bin/pwsh
conda activate ml
cd $HOME
tar -xvf ./cudnn-linux-x86_64-8.9.7.29_cuda12-archive.tar.xz
cp cudnn-*-archive/include/* $Env:CONDA_PREFIX/include/
cp -P cudnn-*-archive/lib/* $Env:CONDA_PREFIX/lib/
sudo chmod a+r $Env:CONDA_PREFIX/include/cudnn*.h $Env:CONDA_PREFIX/lib/libcudnn*
Configure some environment variables for cuda and cudnn:
First, we can take advantage of conda’s feature/mechanism,
saving environment variables, and create 2 configuration files as:1
2
3
4
5
6
7#!/bin/pwsh
conda activate ml
cd $Env:CONDA_PREFIX
mkdir -p ./etc/conda/activate.d # `-p` is for multi-level directory
mkdir -p ./etc/conda/deactivate.d
touch ./etc/conda/activate.d/env_activate.ps1
touch ./etc/conda/deactivate.d/env_deactivate.ps1Edit the above 2 scripts by VS Code:
1
2
3
4#!/bin/pwsh
conda activate ml
cd $Env:CONDA_PREFIX
code ./etc/condaThe script file
./activate.d/env_activate.ps1will be run whenconda activate, so we can configure it as the following:1
2
3
4
5
6
7
8
9
10
11
12
13#!/bin/pwsh
# $Env:CONDA_PREFIX/etc/conda/activate.d/env_activate.ps1
Register-AndBackupEnvItemForConda -Name 'CUDA_PATH' -Value $Env:CONDA_PREFIX
if ($Env:LD_LIBRARY_PATH){
Register-AndBackupEnvItemForConda -Name 'LD_LIBRARY_PATH' -Value "$Env:CONDA_PREFIX/lib:$Env:LD_LIBRARY_PATH"
} else {
Register-AndBackupEnvItemForConda -Name 'LD_LIBRARY_PATH' -Value "$Env:CONDA_PREFIX/lib"
}
# Set TF_CUDA_PATHS
# See https://github.com/tensorflow/tensorflow/blob/bfa5da03f4e1444d4fac777c5ee20b50ed6794b4/third_party/gpus/find_cuda_config.py#L26-L29
Register-AndBackupEnvItemForConda -Name 'TF_CUDA_PATHS' -Value $Env:CONDA_PREFIXThen, the script file
./deactivate.d/env_deactivate.ps1will be run whenconda deactivate(include autodeactivate), so we can configure it as the following:1
2
3
4
5#!/bin/pwsh
# $Env:CONDA_PREFIX/etc/conda/deactivate.d/env_deactivate.ps1
Unregister-WithBackupEnvItemForConda -Name 'CUDA_PATH'
Unregister-WithBackupEnvItemForConda -Name 'LD_LIBRARY_PATH'
Unregister-WithBackupEnvItemForConda -Name 'TF_CUDA_PATHS'This step is the most important one of this article. It relates to many potential bugs, such as “cannot find cuda/cudnn”, “cannot detect GPU”, .etc.
The commands,
Register-AndBackupEnvItemForCondaandUnregister-WithBackupEnvItemForConda, are from the installed PowerShell module PSComputerManagementZp. These 2 commands do nothing but help to set and unset$Env:XXXandEnv:XXX_CONDA_BACKvariables. So, don’t be confused by their very long names.At last, we can deactivate the conda env and re-activate it. Then, the above environment variables’ configuration will take effect.
Check cuda and cudnn installation:
First, check
nvcc:1
2
3#!/bin/pwsh
conda activate ml
nvcc -VWe will see as the following:
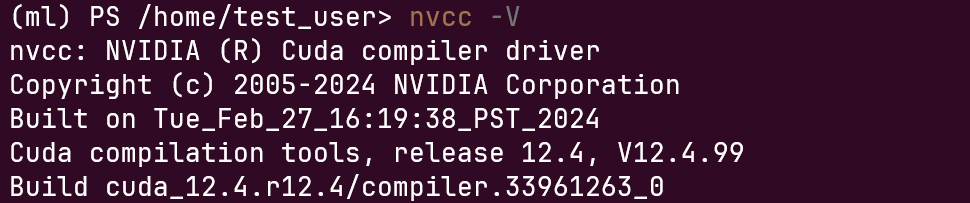
Then, check cuda compiling:
1
2
3
4
5
6
7
8
9
10
11#!/bin/pwsh
conda activate ml
cd $HOME
git clone https://github.com/NVIDIA/cuda-samples.git
cd cuda-samples/Samples/1_Utilities/deviceQuery
sudo apt install build-essential
make clean && make
./deviceQuery # check if `Result = PASS`
cd ../bandwidthTest/
make clean && make
./bandwidthTest # check if `Result = PASS`If the words like Result = PASS is shown, it means the test passed.
Next, check cudnn compiling:
Clone
cudnn_samples_v8codes and installlibfreeimage-dev1
2
3
4
5#!/bin/pwsh
conda activate ml
cd $HOME
git clone https://github.com/johnpzh/cudnn_samples_v8.git
sudo apt install libfreeimage-devSince
cudnn_samples_v8codes is outdated, we should modify a small point of the file$Home/cudnn_samples_v8/samples_common.mk:1
2#!/bin/pwsh
code $Home/cudnn_samples_v8/samples_common.mkModify the line 41 from
SMS ?= 35 50 53 60 61 62 $(SMS_VOLTA) $(SMS_A100)toSMS ?= 50 53 60 61 62 $(SMS_VOLTA) $(SMS_A100), i.e., delete35fromSMS.Then we can continue to compile and test:
1
2
3
4
5
6#!/bin/pwsh
conda activate ml
cd $HOME
cd cudnn_samples_v8/mnistCUDNN/
make clean && make
./mnistCUDNN # check if `Test passed!`
If the words like Result = PASS is shown, it means the test passed.
Install TensorFlow(GPU)
If the above steps have been done well, the remaining steps will be very easy:
1 | #!/bin/pwsh |
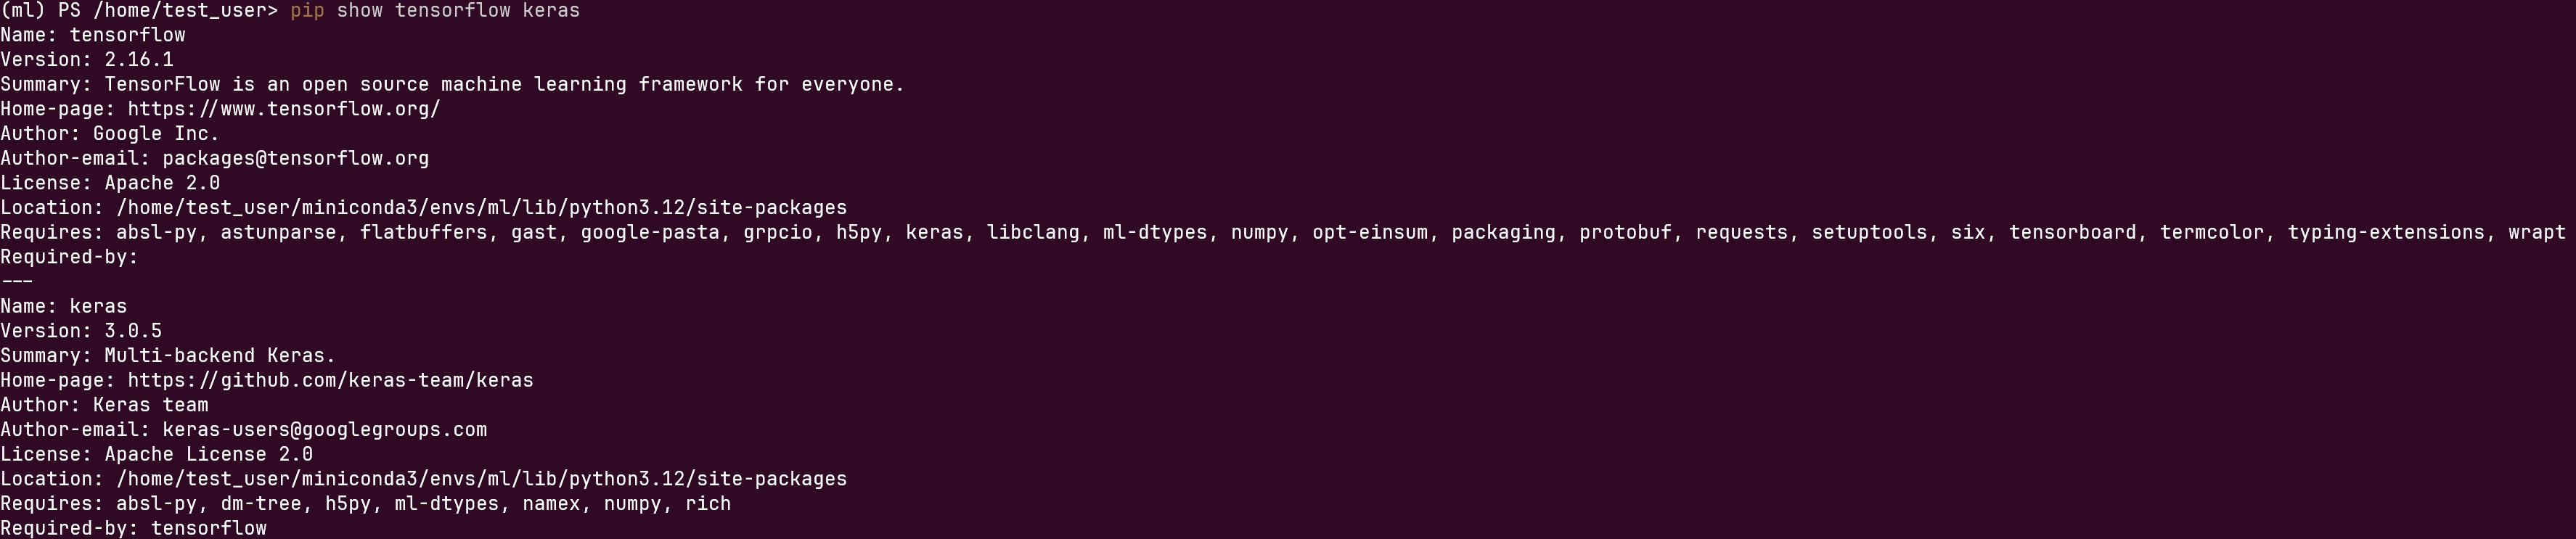
Check the version of tensorflow and keras :
1 | #!/bin/pwsh |
And test the installation:
1 | #!/bin/pwsh |
Then, type in (copy and paste) the following codes(even in command line):
1 | import tensorflow as tf |
At last, we should see the training and evaluating procedures smoothly as:
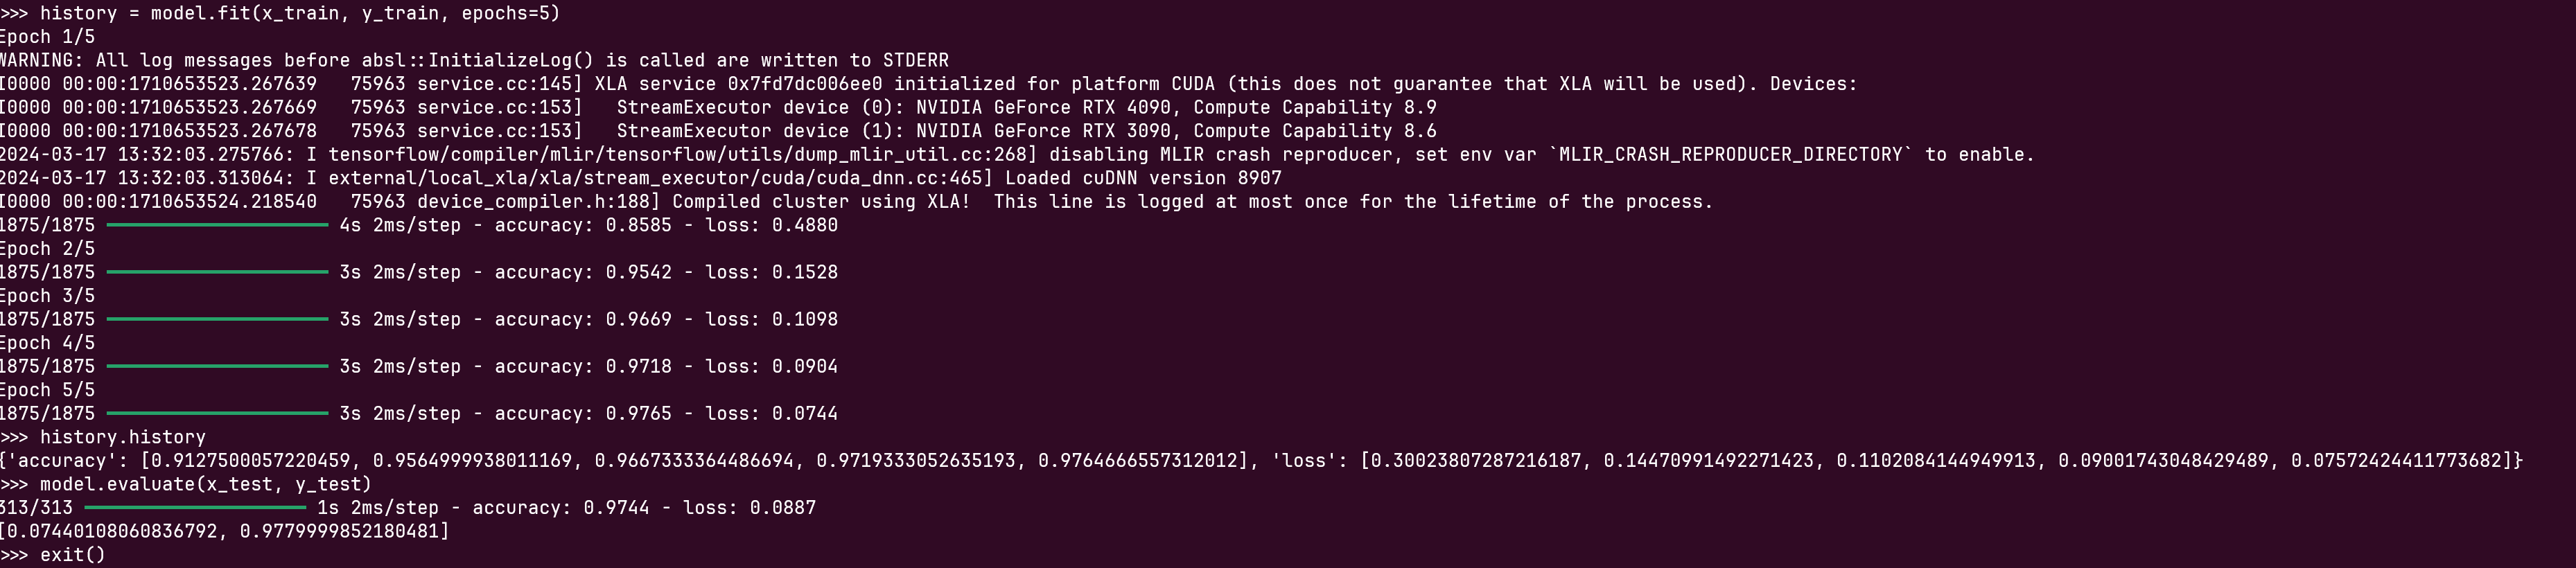
At this point, we have installed TensorFlow(GPU)(2.6.1), with keras(3.0.5) successfully.
Conclusion
This article introduces my steps of installing and using TensorFlow(GPU)(2.6.1), with keras(3.0.5) on WSL2. Different from normal tutorials, I use conda to manage an environment to install cuda and cudnn. Then, I install TensorFlow(GPU) to this environment.
The specific environment (version number) is:
- WSL2:
2.0.14.0 - WSL2’s Linux system:
Ubuntu22.04 - PowerShell:
7.4.1 - PSComputerManagementZp:
0.1.3 - Conda:
24.1.2 - Cuda:
12.4.0 - Cudnn:
8.9.7.29 - Python:
3.12.2 - TensorFlow:
2.16.1 - Keras:
3.0.5
Now, you can take all above steps on your own. Wish you a successful installation!
Reference
 wechat
 alipay